How to Set Up Scan to SharePoint Online Using a Multifunction Printer and Power Automate
Setting up a multifunction printer (MFP) to scan documents directly into a SharePoint Online document library is easier than it sounds — and we’re going to walk you through it step by step using Power Automate and Microsoft 365.
Whether you’re scanning invoices, contracts, or other business records, this setup streamlines your workflow and keeps everything in the cloud.
🔧 Step 1: Set Up Your MFP to Send Emails
Before anything else, your MFP needs to be able to send emails. There are two main methods you can use in Microsoft 365:
- Direct Send (Recommended for Internal Only):
This allows your MFP to send email using your Office 365 MX record without authentication. This only works when sending to addresses within your own Microsoft 365 tenant. - Direct Send with a Connector (For External Email):
If you want the MFP to send email outside your organization, you’ll need to configure a connector. This is Option 3 in Microsoft’s official guide here:
👉 Set up scan-to-email with Office 365
👤 Step 2: Create a Power Automate Service Account
You’ll want a dedicated Microsoft 365 account for Power Automate flows. This keeps things organized and secure.
Requirements:
- The account must have an Exchange mailbox
- The account must have a license that supports Power Automate
Licenses that include both a mailbox and Power Automate:
- Microsoft 365 Business Standard
- Microsoft 365 Business Premium
- Office 365 E1
- Office 365 E3
- Office 365 E5
- Microsoft 365 E3
- Microsoft 365 E5
Give this account a recognizable name, like flow.service@yourdomain.com.
📂 Step 3: Create a SharePoint Library
Next, create the location in SharePoint where you want the scanned files to go.
Example setup:
- Site:
https://yourdomain.sharepoint.com/sites/Accounting - Document Library:
Scanned Items - Folder:
Invoices
Make sure your service account has Edit or higher permissions to the folder.
📩 Step 4: Create a Shared Mailbox for Incoming Scans
Set up a shared mailbox for receiving scan emails. This keeps things centralized and easy to manage.
Example: Scan-To-SPO-Invoices@yourdomain.com
- Grant Delegate Access (Full Access and Send As) to the Power Automate service account
⚙ Step 5: Configure Power Automate
1. Go to Power Automate and sign in as the service account.
2. In the left menu, go to Connections
Create new connections for:
- Outlook (Office 365 Outlook)
- SharePoint
3. Go to My Flows > + New Flow > Automated Cloud Flow
Flow Name: Scan - Invoices
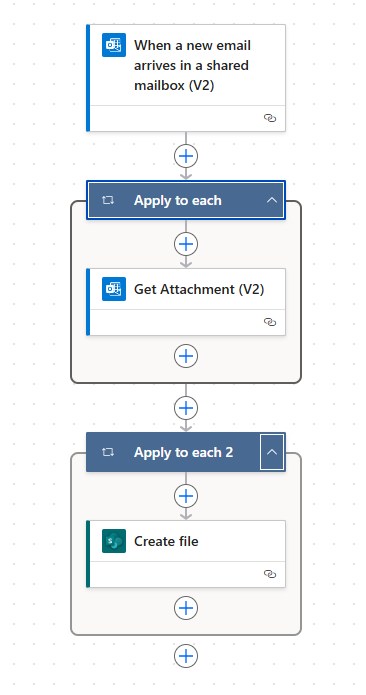
Trigger: When a new email arrives in a shared mailbox (V2)
Set up the trigger:
- Shared Mailbox Address:
Scan-To-SPO-Invoices@yourdomain.com
4. Add Action: Get Attachment (V2)
- Message ID: Use dynamic content
Message ID - Attachment ID: Use dynamic content
ID
5. Add Action: Create File (SharePoint)
- Site Address: Your SharePoint site URL
- Folder Path:
/Scanned Items/Invoices - File Name:
Name - File Content:
ContentBytes
It should look something like this:
🔒 Optional Step 6: Apply a Retention Policy to Clean Up the Shared Mailbox
To keep your shared mailbox from filling up indefinitely, you can apply a Microsoft Purview retention policy to automatically delete older messages — for example, anything older than 30 days. This helps with both compliance and mailbox hygiene.
How to Set Up a Retention Policy for Specific Mailboxes
- Go to the Microsoft Purview Compliance Portal: compliance.microsoft.com
- In the left menu, go to Data lifecycle management > Microsoft 365 > Retention policies
- Click + Create retention policy
- Name your policy (e.g.,
Auto-Delete Scan Mailbox After 30 Days) - Under Retention settings:
- Choose Only delete items when they reach a certain age
- Set retention period to 30 days
- Choose Delete items automatically
- Under Choose locations to apply the policy:
- Select Exchange email, then choose Let me choose specific mailboxes
- Select your shared mailbox (e.g.,
Scan-To-SPO-Invoices@yourdomain.com)
- Review and create the policy
Retention will apply to the mailbox shortly after policy activation. This step is especially useful in automation-heavy environments where scanned files can accumulate rapidly.
✅ Bonus Tips
- You can add conditional logic to route different file types to different folders.
- Enable file versioning in your SharePoint library to avoid overwriting.
- Add notifications or Teams integration for real-time alerts.
🎉 That’s It!
Now, any time your MFP sends a scan to the shared mailbox, Power Automate will scoop up the attachment and drop it right into SharePoint — no manual work required.
If you’d like help setting this up for your business, reach out to TC Tech Pros — we’re all about making cloud tools work smarter for your team.